Chapter 1 · Method and the microscopeLesson 1.4
The light microscope: parts, magnification, resolution and the wet mount
How do you see a cell a few micrometres across, and how do you find out how big it really is?
- Size
- from 1 mm to 1 nm
- Level
- cell and cell structures
- Time
- one lesson in the lab
Before you read: what do you think?
Through the school microscope, at a magnification of 400×, you photograph an onion cell, then blow the photo up ten times on screen. Can you now see the cell’s ribosomes, which are 10–30 nm across?
See the answer
No. A light microscope cannot separate two points closer than about 0.2 µm, that is 200 nm. Enlarging the photo makes the blur bigger without splitting it into details. Ribosomes can be seen only with an electron microscope.
One of your red blood cells is 7–8 µm across. Taking 8 µm, 250 of them would fit in a line across the head of a pin, which is about 2 mm wide. The naked eye cannot separate two points closer than about 0.1 mm. To see cells, you need an instrument that magnifies their image: the light microscope.
The parts of the light microscope
The light microscope uses light and a system of lenses to magnify the image of a small, thin object. The mechanical parts hold and move the pieces: the base, on which the whole instrument stands; the arm, by which you hold the microscope when you carry it; the tube; the nosepiece, a disc that turns and brings the objectives one by one over the specimen; the stage, on which the slide is placed, held by two clips, over a hole through which light passes.
The image is brought into focus with two knobs. The coarse focus knob moves the stage or the tube up or down a long way and is used with the low-power objectives, 4× and 10×. The fine focus knob makes very small movements, for fine adjustment, especially with the 40× and 100× objectives.
The optical parts form the image. The eyepiece is the lens next to your eye. The objectives, usually 4×, 10×, 40× and 100×, are the lenses next to the specimen; the magnification of each, for example “10×”, is written on its casing. Under the stage are the condenser, which gathers light onto the specimen, and the diaphragm, which adjusts the amount of light. The light comes from a bulb or, on old microscopes, from a mirror that reflects it from the room.
Magnification: eyepiece × objective
The image is magnified twice in a row, first by the objective and then by the eyepiece. That is why the total magnification is the product of the two: eyepiece × objective. With a 10× eyepiece and the 40× objective, the magnification is 10 × 40 = 400×. Microscopes in school laboratories usually magnify up to about 400 times; with the 100× objective and a drop of oil between the lens and the slide, magnification reaches 1,000×.
Objects seen under the microscope are measured in small units. There are 1,000 micrometres in a millimetre: 1 mm = 1,000 µm. There are 1,000 nanometres in a micrometre: 1 µm = 1,000 nm. Cells are usually measured in micrometres, and the structures inside them, such as ribosomes or membranes, in nanometres.
Magnification and resolution
Magnification shows how many times bigger the image is than the object. Resolution (resolving power) is the ability to see two very close points as separate. The naked eye separates points about 0.1 mm apart. The light microscope separates points about 0.2 µm apart, that is 200 nm, 500 times closer.
The light microscope’s limit comes from light itself and cannot be overcome by enlarging the image. Beyond it, the image gets bigger but no sharper. A structure smaller than 200 nm shows up at most as a dot, with no shape.
The electron microscope uses a beam of electrons instead of light. It magnifies more than 100,000 times and separates details a few nanometres apart or less. But the cells have to be killed, fixed and specially prepared, so living cells cannot be observed with an electron microscope.
| Image | What you see | Method | Colour | Scale |
|---|---|---|---|---|
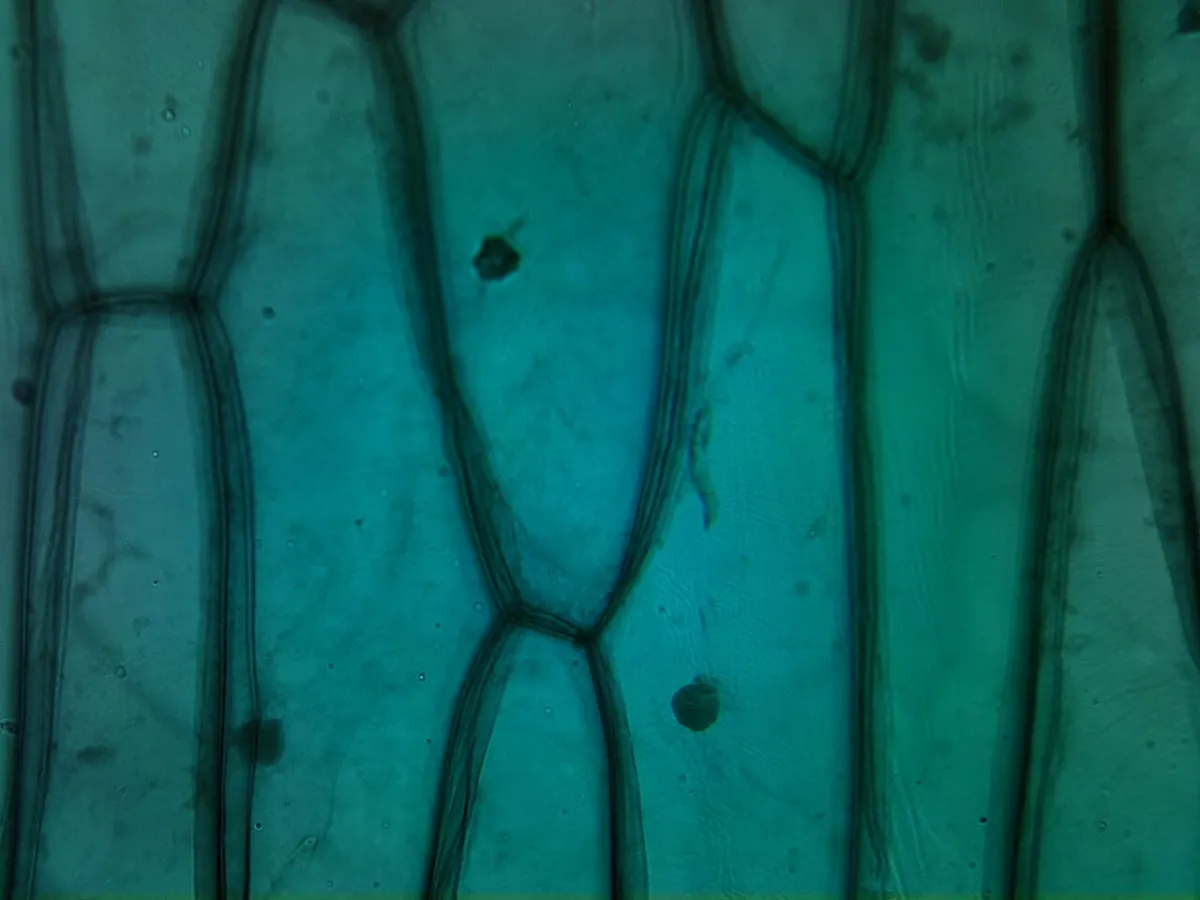
| Red onion epidermis (Allium cepa) | a skin (epidermis) peeled from a bulb scale: a single layer of cells, spread flat on the slide | light microscope, 100× magnification, light passing through the specimen | natural colour: the red pigment in the vacuoles of the cells | the bar in the image: 200 µm = 357 px |
| Spirogyra filament (Spirogyra sp.) | a whole, living filament seen by transmitted light; the chloroplast is a twisted ribbon | light microscope, light passing through the specimen | natural colour: the green of the chlorophyll in the chloroplast | the bar in the image: 25 µm = 151 px |
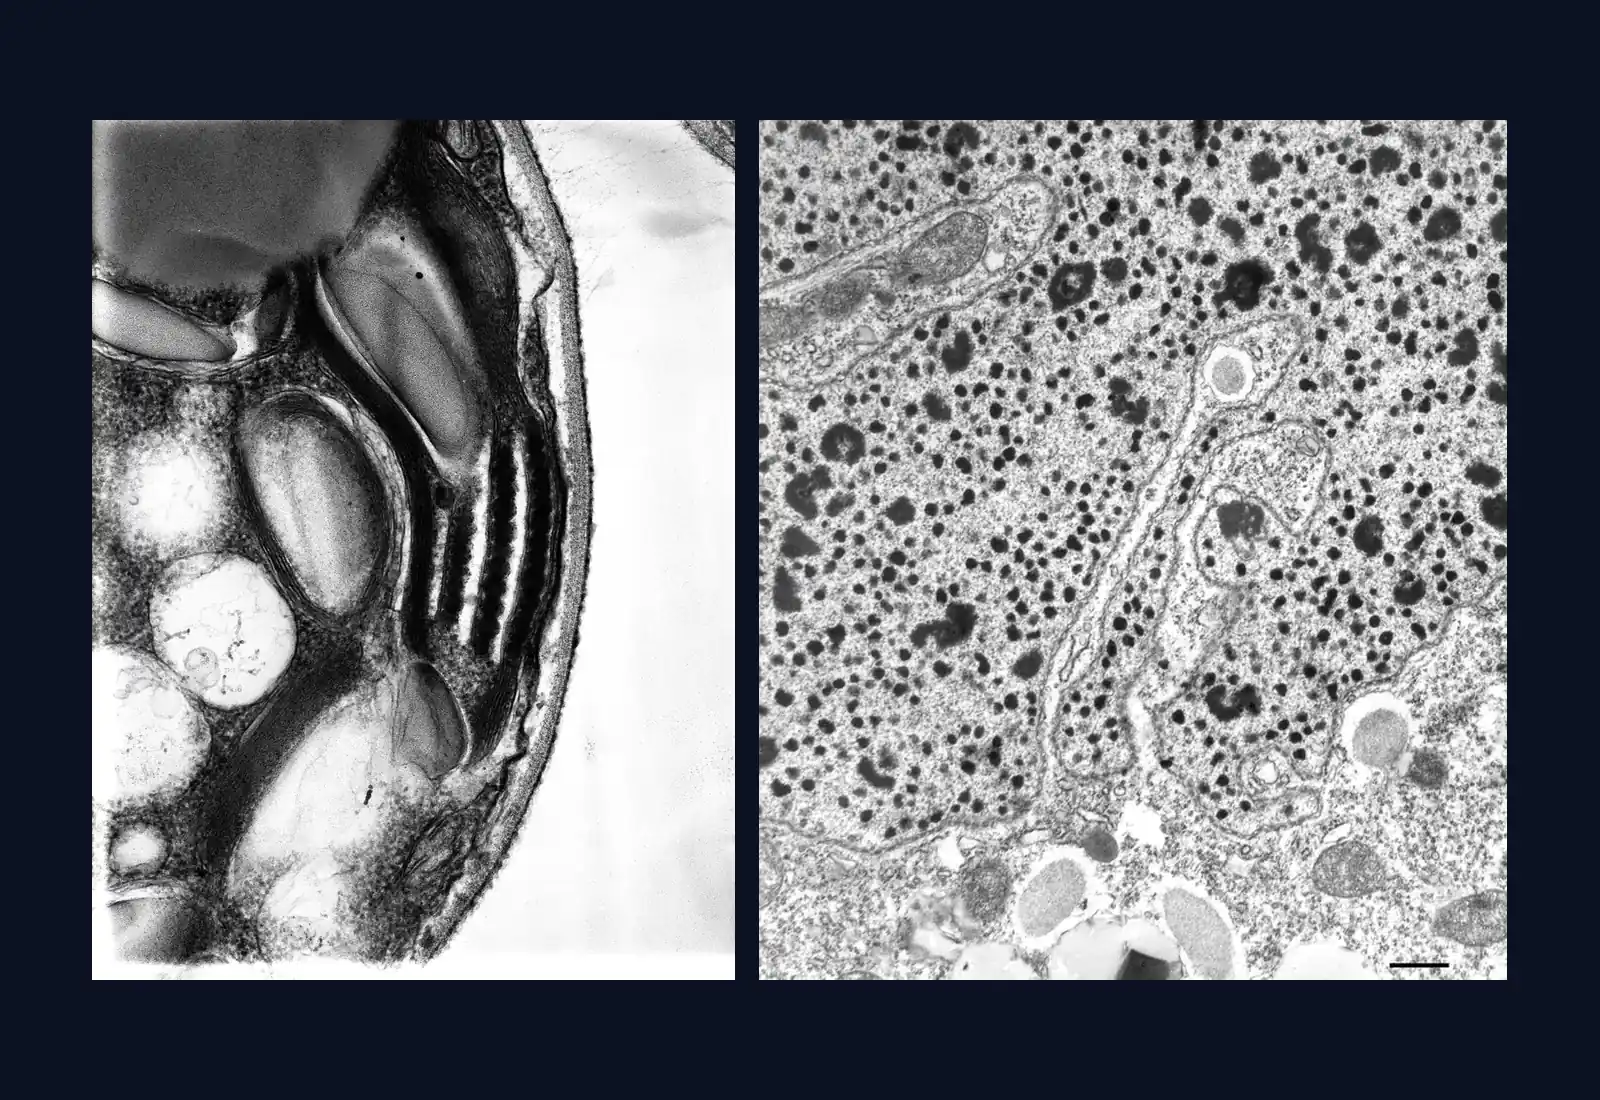
| Chloroplast from a bean leaf (Phaseolus) | a very thin section through a leaf cell: you see a slice of the chloroplast, not the whole chloroplast | transmission electron microscope (a beam of electrons passes through the section) | false colour: the green was added after the photograph was taken; electrons have no colour | the whole frame is 4.5 µm wide (2,400 px), stated by the source |
| Chloroplast and eyespot of Chlamydomonas (Chlamydomonas reinhardtii) | a 250 nm section through the cell: part of the chloroplast and the eyespot (the reddish patch), not the whole cell | transmission electron microscope, 1,000 kV, section tilted by 6° | no colour: the shades of grey show how strongly each structure stops the electrons | 0.8 nm per pixel, stated by the source |
| A small part of the macronucleus of a Paramecium (Paramecium multimicronucleatum) | a section of about 75 nm through a small part of the macronucleus; the whole macronucleus can be 35 µm long and 12 µm wide | transmission electron microscope, 10,000× negative, printed on paper and scanned | no colour: the shades of grey show how strongly each structure stops the electrons | a 0.5 µm bar, but no measuring: a scanned image, for qualitative analysis |
| What is measured | Pixels in the original | Calculation | Result |
|---|---|---|---|
| Red onion epidermis: length of a cell | 227 px | 227 ÷ 357 × 200 µm | 127 µm (between 107 and 148 µm) |
| Chloroplast from a bean leaf: length of the chloroplast | 1,818 px | 1,818 ÷ 2,400 × 4.5 µm | 3.41 µm (between 2.9 and 3.92 µm) |
| Chloroplast from a bean leaf: thickness of a granum | 94 px | 94 ÷ 2,400 × 4.5 µm | 176 nm (between 138 and 215 nm) |
| Chlamydomonas: sample segment | 1,000 px | 1,000 × 0.8 nm | 0.8 µm = 800 nm; at any digital zoom still 0.8 µm |
| Chlamydomonas: half of the segment | 500 px | 500 × 0.8 nm | 0.4 µm |
| Bean chloroplast: distance between two neighbouring membranes of a granum | 87 px over 9 intervals | 87 ÷ 2,400 × 4.5 µm ÷ 9 | about 18 nm |
| 1 mm = 1,000 µm | 1 µm = 1,000 nm |
| the naked eye separates points about 0.1 mm = 100 µm apart | the school light microscope separates points about 0.2 µm = 200 nm apart |
| a red blood cell: around 8 µm | the macronucleus of Paramecium: up to 35 µm × 12 µm |
Micrograph and calculation. The images are real photographs taken through a microscope; the lengths are calculated from the pixels of the original image and from the scale each source states (the scale bar, the pixel size or the frame width). The images were only reduced in size (and the Spirogyra one cropped), with the factor kept in the calculation. The green of the bean chloroplast is false colour, added by the author. Digital zoom adds no detail. Sources: Red onion epidermis: Adrian J. Hunter, Wikimedia Commons, CC BY-SA 3.0; Spirogyra filament: Sándor Bancsó, Bancsó (2021), Kitaibelia 26, via Wikimedia Commons, CC BY 4.0; Chloroplast from a bean leaf: Kevin Mackenzie, University of Aberdeen, Wellcome Collection, B0009849, CC BY 4.0; Chloroplast and eyespot of Chlamydomonas: Mary Morphew, J. Richard McIntosh, Cell Image Library, CIL:9523, doi:10.7295/W9CIL9523, public domain; A small part of the macronucleus of a Paramecium: Richard Allen, University of Hawaii, Cell Image Library, CIL:36646, doi:10.7295/W9CIL36646, public domain.

Sources and credits. Red onion epidermis: Adrian J. Hunter, Wikimedia Commons, CC BY-SA 3.0 (source) · Spirogyra filament: Sándor Bancsó, Bancsó (2021), Kitaibelia 26, via Wikimedia Commons, CC BY 4.0 (source) · Chloroplast from a bean leaf: Kevin Mackenzie, University of Aberdeen, Wellcome Collection, B0009849, CC BY 4.0 (source) · Chloroplast and eyespot of Chlamydomonas: Mary Morphew, J. Richard McIntosh, Cell Image Library, CIL:9523, doi:10.7295/W9CIL9523, public domain (source) · A small part of the macronucleus of a Paramecium: Richard Allen, University of Hawaii, Cell Image Library, CIL:36646, doi:10.7295/W9CIL36646, public domain (source)
The wet mount and the drawing
A wet mount (a fresh preparation) is made from living material, placed in a drop of water on a slide, a rectangular glass plate, and covered with a coverslip, a very thin glass plate. For onion epidermis: put a drop of water on a clean slide, use tweezers to peel the thin skin from the inner face of an onion layer, spread it out in the drop, then lower the coverslip at an angle, resting on one edge, and let it down slowly so that no air bubbles are left. A drop of stain, such as methylene blue, placed at the edge of the coverslip, makes the nuclei easier to see.
Observation starts with the lowest-power objective and the coarse focus knob. Once the image is sharp, move to 10× and then to 40×, using only the fine focus knob, so that the objective does not touch the slide.
A drawing from the microscope is made in pencil, with continuous lines and no shading, and shows only what you see. It gets a title, labels joined to the structures by straight lines, and the magnification at which you observed, for example “onion epidermis, 400×”.

Worked example
How big is the cell in the micrograph
A micrograph has a scale bar in the corner: a line 20 mm long on paper, labelled “10 µm”. A cell in the same image is 54 mm long, measured with a ruler. The numbers are chosen for the exercise.
Step 1. How many micrometres one millimetre on paper stands for: 10 µm ÷ 20 mm = 0.5 µm for every millimetre. Step 2. The real length of the cell: 54 × 0.5 = 27 µm. The same result: 54 ÷ 20 × 10 = 27 µm.
Step 3. The magnification of the image: convert the bar to the same unit, 20 mm = 20,000 µm, and divide by what it stands for, 20,000 µm ÷ 10 µm = 2,000×. Check: real size = image size ÷ magnification = 54,000 µm ÷ 2,000 = 27 µm.
The scale bar stays correct if the image is enlarged or shrunk, because it changes along with it. A magnification printed under a photo becomes wrong as soon as the photo is printed at a different size.
In Romania
George Emil Palade and the 10–15 nm granules
George Emil Palade, the Romanian-born cell biologist, was born in Iași on 19 November 1912 and studied medicine in Bucharest. After the Second World War he worked in the United States, where he used the electron microscope to study the cells in tissues.
In 1955 he described a component of the cytoplasm made of small, dense particles, most of them 100–150 Å across, that is 10–15 nm. They are more than ten times smaller than the light microscope’s 200 nm limit, so they could be seen only with an electron microscope. The particles were later named ribosomes. The current atomic model of the human ribosome is 26–30 nm across, roughly twice what Palade had measured on sections.
In 1974 Palade received the Nobel Prize in Physiology or Medicine, together with Albert Claude and Christian de Duve, “for their discoveries concerning the structural and functional organization of the cell”.
In short
- The light microscope has mechanical parts (base, arm, tube, nosepiece, stage with clips, coarse and fine focus knobs) and optical parts (eyepiece, objectives, condenser, diaphragm, light source or mirror).
- Total magnification is the product of the eyepiece magnification and the objective magnification: 10 × 40 = 400×.
- 1 mm = 1,000 µm and 1 µm = 1,000 nm; cells are usually measured in micrometres.
- Resolution is the ability to separate two close points: about 0.1 mm for the eye, 0.2 µm for the light microscope, a few nanometres or less for the electron microscope.
- A wet mount is made from living material in a drop of water on a slide, covered with a coverslip lowered at an angle; observation starts with the lowest-power objective.
- Real size = image size ÷ magnification; the scale bar shows directly what real length a line in the image stands for.
Common mistakes
WrongIf I enlarge the image enough, I can see anything with a light microscope, even ribosomes.
RightBeyond the limit of about 0.2 µm, the image gets bigger but no sharper. Ribosomes, at 10–30 nm, can be seen only with an electron microscope.
WrongTotal magnification is found by adding the eyepiece and the objective: 10 + 40 = 50×.
RightTotal magnification is the product: 10 × 40 = 400×, because the objective magnifies the image and the eyepiece magnifies it again.
WrongWith the 40× objective I focus with the coarse focus knob.
RightAt 40× only the fine focus knob is used. The coarse focus knob moves too far, and the objective can hit the slide and crack it.
Check yourself
Seven questions. For the first six you see the explanation at once, with the paragraph of the lesson that supports it; for the written ones you compare with a good answer.
What is the total magnification with a 10× eyepiece and a 40× objective?
Answer
c) 400×. Total magnification is the product of the two magnifications: 10 × 40 = 400×.
What does the fine focus knob do?
Answer
b) It makes very small movements, for fine adjustment of the image. The objectives are changed with the nosepiece, the light is adjusted with the diaphragm, and the slide is held by the clips.
Why can’t ribosomes be seen with a light microscope, however much you enlarge the image?
Answer
b) Because they are smaller than the resolution limit of about 200 nm. The resolution of the light microscope is about 0.2 µm. Beyond it, magnification adds no more detail.
On a micrograph, the scale bar is 20 mm long and stands for 10 µm. A cell measures 54 mm on the image. What is its real length, in micrometres?
µmAnswer
27 µm. One millimetre on the image stands for 10 ÷ 20 = 0.5 µm, so the cell is 54 × 0.5 = 27 µm.
Put in order the steps for making a wet mount of onion epidermis and observing it.
Answer
The correct order:
- Put a drop of water on a clean slide
- Use tweezers to peel the skin from the inner face of an onion layer
- Spread the skin out in the drop of water
- Lower the coverslip at an angle and let it down slowly
- Observe first with the lowest-power objective and the coarse focus knob
- Move to 40× and focus only with the fine focus knob
The slide and water are prepared before the material; the coverslip goes on at an angle so that no bubbles are left; observation goes from low to high magnification.
Sort the parts of the microscope: mechanical or optical?
Answer
Mechanical parts: The nosepiece; The stage with clips; The coarse focus knob.
Optical parts: The eyepiece; The condenser; The 40× objective.
The mechanical parts support and move; the optical parts contain the lenses and the pieces that direct the light.
A classmate says the electron microscope is better than the light microscope in every way. Explain why the school laboratory still uses a light microscope to look at an onion cell or a swimming paramecium.
A good answer
The electron microscope has much better resolution and separates details a few nanometres apart, but the cells have to be killed and fixed, so it cannot show living cells. An onion cell, tens of micrometres across, is clearly visible at 100–400× with a light microscope, and a paramecium can be watched alive, moving, in a wet mount.
A complete answer compares the resolution of the two microscopes, names the limit of the electron microscope (no living cells) and shows that cells are visible at the light microscope’s magnification.
Practical work for this lesson
- The micrograph: observation and scale – Observation of electron micrographs, 30–40 minutes
Terms
- light microscope
- An instrument that magnifies the image of small objects using light and a system of lenses.
- total magnification
- The product of the eyepiece magnification and the objective magnification.
- resolution
- The ability of an instrument to show two very close points as separate.
- wet mount
- Living material placed in a drop of water on a slide and covered with a coverslip, for immediate observation.
- scale bar
- A line drawn on an image, labelled with the real length it stands for.
- micrometre
- A unit of length equal to one thousandth of a millimetre (1 µm = 0.001 mm).
- electron microscope
- A microscope that uses a beam of electrons and separates details a few nanometres apart or less.
Sources and link to the programme
- OpenStax – Microbiology, 2.3 Instruments of Microscopy – eyepiece, objectives on the nosepiece (4×–100×), the stage, coarse focus for 4× and 10×, fine focus for 40× and 100×, condenser, diaphragm, light source; total magnification = eyepiece × objective (10 × 40 = 400×); immersion oil; sharpness up to about 1,000×
- OpenStax – Biology 2e, 4.1 Studying Cells – definitions of magnification and resolution; laboratory microscopes magnify up to about 400×; resolution of the light microscope around 200 nm; the electron microscope magnifies 100,000× and cannot observe living cells; red blood cell about 8 µm; pinhead about 2 mm
- OpenStax – Microbiology, 2.4 Staining Microscopic Specimens – the wet mount (drop of liquid, specimen, coverslip) and stains, including methylene blue
- James Madison University – Microscopy primer: resolution – resolution of the eye, about 0.1 mm; resolution of the light microscope, 0.2 µm (200 nm)
- NobelPrize.org – The Nobel Prize in Physiology or Medicine 1974 – the prize shared by Claude, de Duve and Palade, and its citation
- NobelPrize.org – George E. Palade, Facts – born on 19 November 1912 in Iași
- NobelPrize.org – George E. Palade, Biographical – medical studies in Bucharest (from 1930), the move to the United States after the war, work with Albert Claude on the electron microscope
- Marius Comper – George Palade (page with the sources and the size calculations) – the same numbers and the same cautious wording: the 10–15 nm granules (150 Å at the upper end) in the 1955 paper, the name “ribosome” proposed in 1958; the current atomic model of the human ribosome, 26–30 nm
- OpenStax – Anatomy and Physiology 2e, 18.3 Erythrocytes – diameter of the red blood cell, 7–8 µm (the same value as in C03-T04)
From the programme: “The scientific method. Research ethics. Observation and experiment in biology: formulating the hypothesis, defining the variables, choosing the methods, collecting and analysing the data, formulating conclusions, communicating the results” (common core). Specific competences addressed: 1.1, 2.1.